Description
** THIS IS A PDF PATTERN. YOU WILL RECEIVE A LINK TO DOWNLOAD THE DIGITAL FILES IN YOUR CONFIRMATION EMAIL AFTER PURCHASE**
Did you know we can print out this pattern on A0 paper and post it to you?
- If you would like us to print out this pattern for you, add this pattern to your cart, then click here.
- It will then ask you how many pages your pattern has. This pattern has 3 PAGES.
- You do not need to upload the pattern file.
For more information about PDF pattern printing check out our PDF Guide.
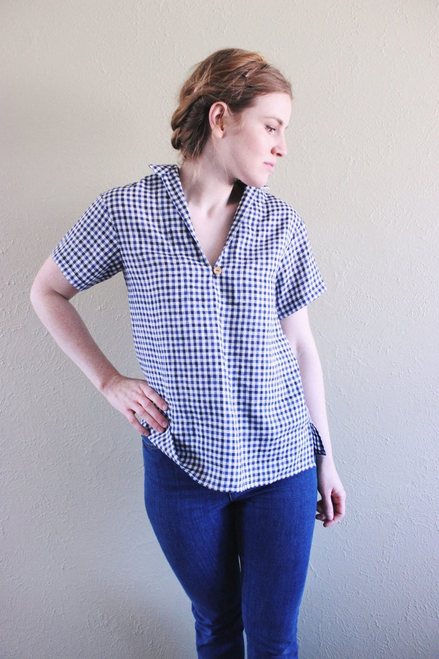
The Demeter dress and top pattern has four different variations to choose from. All views pull over the head with no closures. View A is a loose fitting dress with short set-in sleeves, bust darts, and a slight empire waistline at the front that dips back down to the natural waistline at the back. The skirt is gathered to the bodice, has inseam pockets and a deep hemline. View B is similar to view A, except it has no sleeves and one inch less wearing ease in the body as well as a longer skirt length (3”). View C and D are the companion tops to A and B. The tops are crop length (high hip) and also pull over the head with no closures. All views are oversized and have generous wearing ease. This pattern is drafted for woven non-stretch fabrics.
SEWING LEVEL: Intermediate
linen, cotton, lawn
SIZES: 00-22
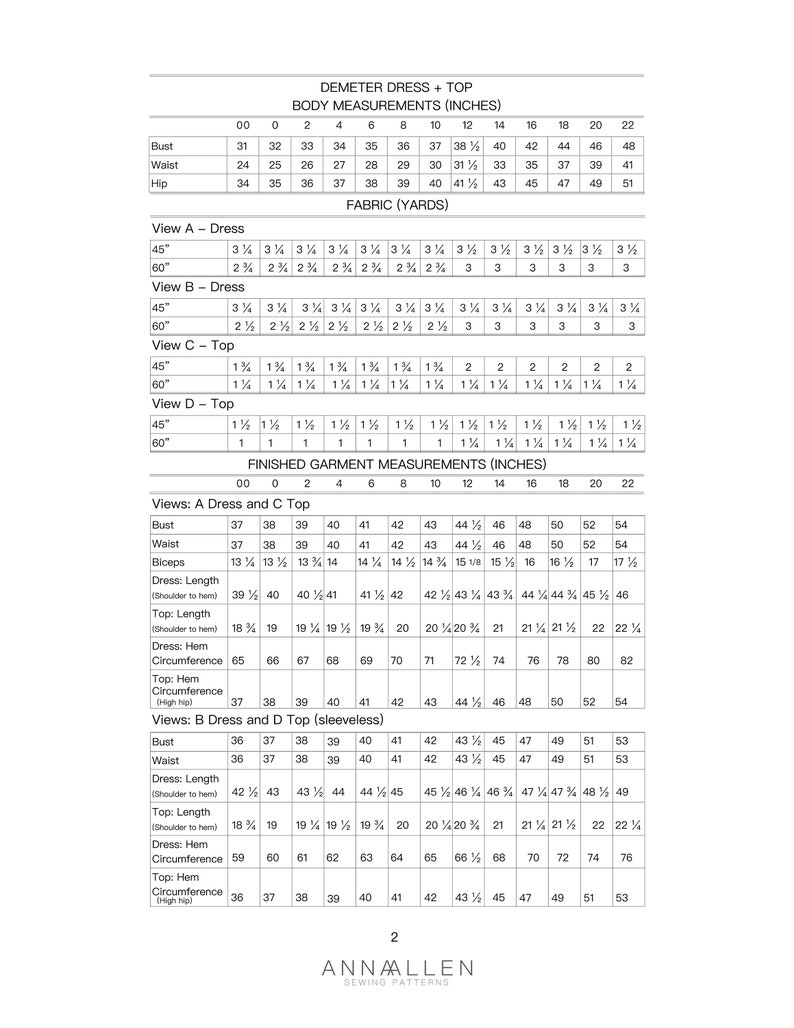
The chart below can also be viewed in the images of this listing where it can be enlarged

PATTERN INCLUDES:
- Sewing instructions with clear illustrations for each step
- Print-at-home pattern
- Map + Key (Map for the print-at-home version with a list of pages to print for each view and a key to the symbols and markings used in the pattern.)
- Copy shop pattern including both US and A0 page sizes
PRINTING YOUR PDF PATTERN
After downloading the files to your computer, you can print out the pattern using your home printer. The pattern pages are formatted to fit US standard page size (8.5” x 11”) as well as A4 page size (8.26” x 11.69”). Be sure the printer settings are set to “actual size” and only print the first page that includes the test square before printing the rest of the pattern. Measure the test square with a ruler to be sure the pattern pages will print accurately. If the measurements are correct, go ahead and print the entire pattern. Assemble the printed pattern by cutting out the pattern pieces and matching them together by the letters and numbers that are marked on each pattern (“1A” to “1A”, “1B” to “1B” etc.) and then taping them together.


